How To & FAQ

Step by Step
- Download and install VirtualTablet Server on your PC (May require reboot after installation).
- Run VirtualTablet Server on your PC.
- Run VirtualTablet on your tablet device with stylus pen and connect to the server.
- You can connect your Android Tablet to PC with USB for more stable and faster speed.
- If PC & tablet are on the same local WIFI network, server will automatically show up in the available server list.
- If not, real IP is required to connect. Check your PC’s IP address on Information tab in Virtual Tablet Server and type the IP manually – How to setup manual connection.
- App will show the best performance when your PC and tablet device are on the same local WIFI network. (Still possible to use when your PC has real IP address. )
- If you want to connect using Bluetooth, you have to allow pairing the device when it is trying to connect.
- After connection established, move your pen around in tablet device. You will see the exact same movement in your PC. Enjoy drawing!
Possible connection scenarios
- For Android devices, connect your tablet to PC with USB. It will show you the best performance.
- When PC running VirtualTablet Server and Tablet running this app are on the same network(ex: both connected to same router), it shows best performance.
- When PC running VirtualTablet Server has its own real IP(not virtual IP allocated by NAT), you can connect by inputting this IP manually.
- If PC has Bluetooth, you can connect PC & tablet by using Bluetooth.
FAQ
Q. Which devices are supported by VirtualTablet?
Please refer following link. List of support devices
Q. By any chance VirtualTablet will support Windows XP in the future?
We’re very sorry but no. Windows XP uses different device driver, so we have to develop it from the scratch and we don’t have much resources to support it currently. Please upgrade your OS.
Q. Does VT support the cursor movement for multi-screen environment?
- Currently multi-screen support is only available for Mac version. It will be supported in the next version for the Windows.
Q. The delay of input is too severe.
- If you are download files in your server or client, this network load may cause the delay on the input of VT. Please refrain from using network with other jobs.
- We recommend to use USB connection for Android device to reduce input delays.
Q. Input just stopped when the screen is touched with pen button down in Galaxy Note Series.
- The touch with pen button down is blocked for S-Pen shortcut created by Samsung. App cannot receive touch info when pen button is down.
- Device’s Menu button is used instead to simulate original functionality of pen button. When you touch Menu button in the tablet screen, you can notice the pen icon with red light on. If you make movement of pen under this condition, it is considered as movement with pen button down.
Q. I used a correct IP address but it is not working.
- Please double check that the PC running VirtualTablet Server and tablet device running this app are on the same local WIFI network.
- If VirtualTablet Server is blocked by Windows Firewall, please allow it(Control Panels – Windows Firewall – Allow an app or feature through Firewall)
– Reboot your router may help to solve this problem.
Q. VirtualTable Server crashes with error code “clr20r3”
- Please check if Microsoft .NET framework v4.0 or higher is installed. If not, download from here https://www.microsoft.com/download/details.aspx?id=49981
Q. VirtualTablet Server status says “client connected”, but there is no cursor movement.
- Check the list of supported devices on the following link
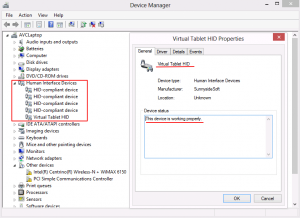
- Open “Control Panel” – “Device Manager”
- Check if device driver is working properly (see markers in screenshot)
-
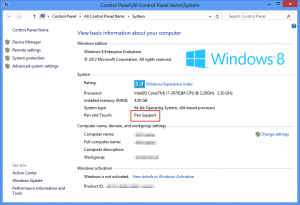
Open “Control Panel” – “System”
- Check “Pen and Touch” item. If you are not using tablet PC, usually Pen and Touch are not basically supported. However it shows “Pen Support” after VirtualTablet driver is correctly installed.
-
If you still don’t have any cursor movement, even though the driver is working properly, please restart your computer and try again.
Q. Installation fails with error code 0x80070643
- Disable Anti-Virus software.
-
Clear files in your windows temporary folders.
- Files in temporary folders are literally temporary files, so it is okay to clear up.
- First “Temp” folder which is found in “C:Windows” directory is a system folder and is used by Windows to store temporary files.
- Second “Temp” folder is stored in “%USERPROFILE%AppDataLocal” directory
- To access these 2 “Temp” folders, you need to use following commands:
TEMP

%TEMP%
You can run these commands in RUN dialog box. Run dialog box can be opened with shortcut “Windows Key + R”.
- Run the setup file as administrator.
-
If it’s still not working after you completed all the steps above, install Windows updates and try again.
** If you have other questions, please post it in the forum to get answers.


